> ## Documentation Index
> Fetch the complete documentation index at: https://docs.answeringagent.com/llms.txt
> Use this file to discover all available pages before exploring further.

# Chat Widget

> Add a multimodal AI chat widget to your website with a single line of code.

<Note>The chat widget provides your visitors with cutting-edge multimodal AI assistance - they can type, speak, or even share images, all in one seamless conversation.</Note>

The Answering Agent chat widget brings next-generation conversational AI to your website. This isn't just another chatbot - it's a multimodal AI assistant that can see, hear, and respond in real-time. Your visitors can switch between typing and speaking mid-conversation, share images for visual assistance, and get natural, context-aware responses.

The widget uses the same AI conversation engine as your phone calls, SMS, and email. It reads the same business knowledge, settings, and eligible integrations, so customers get consistent answers across every channel.

## Quick Start

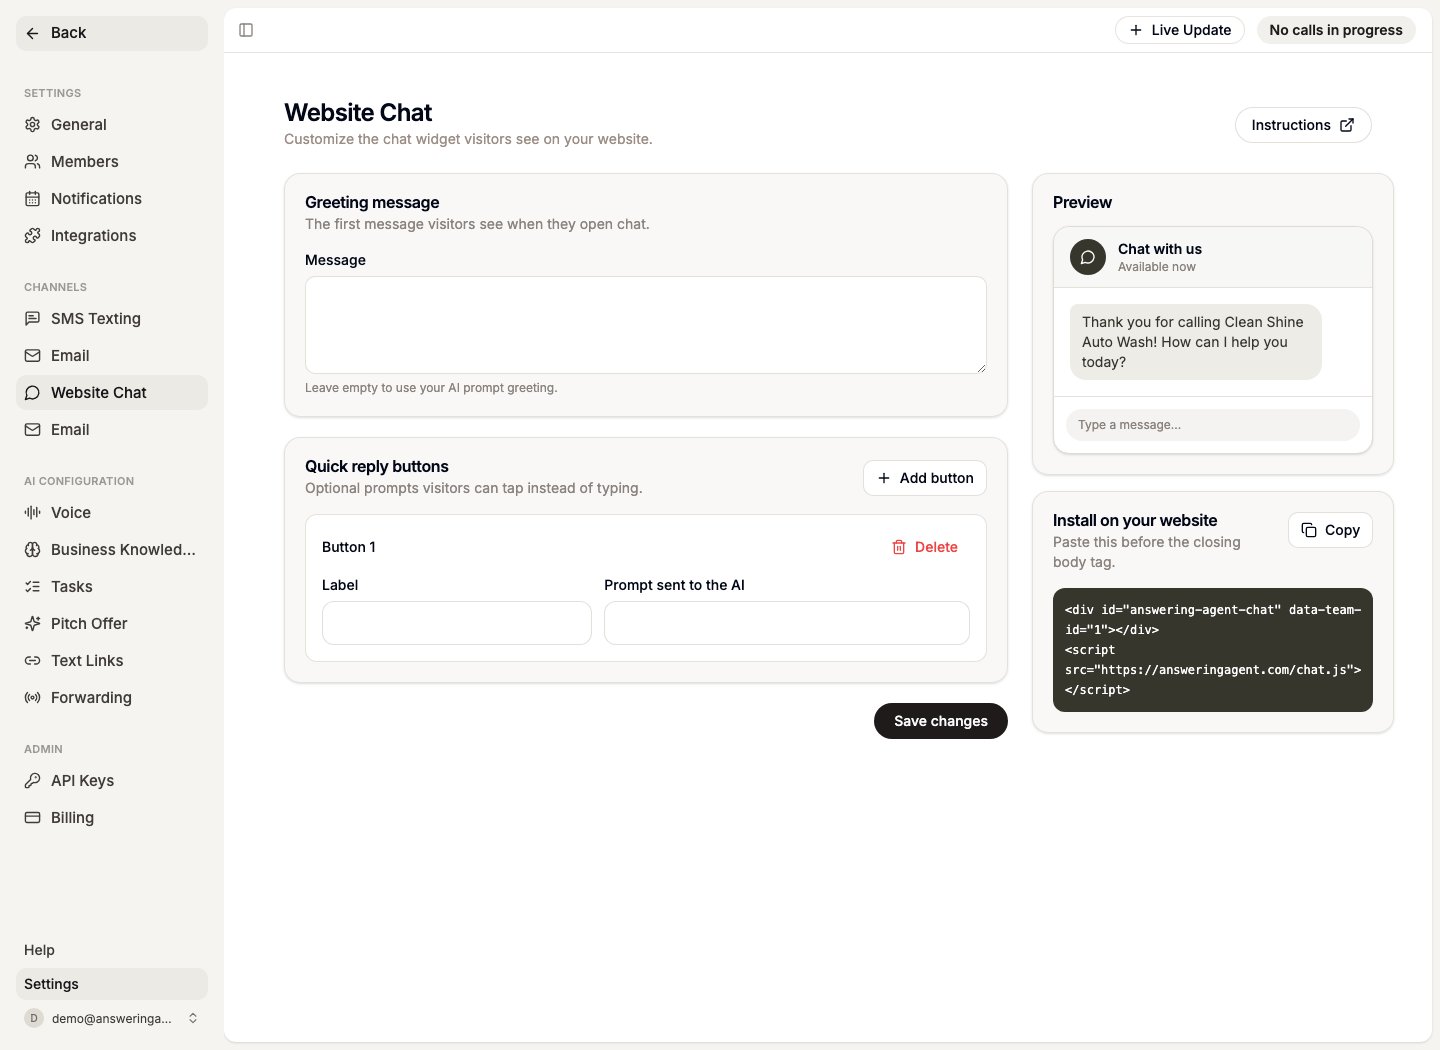
Open **Dashboard** > **Team Settings** > **Website Chat** to customize the greeting, quick replies, and install snippet.
<img src="https://mintcdn.com/answeringagent/wm6dzBbhSPWJcaXR/images/channel-setup/chat-widget-settings.png?fit=max&auto=format&n=wm6dzBbhSPWJcaXR&q=85&s=278905802fe8f5dec45e5a68385d5c74" alt="Website Chat setup page" width="1440" height="1050" data-path="images/channel-setup/chat-widget-settings.png" />

Add the chat widget to your website with just two lines of code:

```html theme={null}
<div id="answering-agent-chat" data-team-id="YOUR_TEAM_ID"></div>
<script src="https://answeringagent.com/chat.js"></script>
```

Replace `YOUR_TEAM_ID` with your team ID from the Answering Agent dashboard.
The `chat.js` loader loads `/embed.css` automatically, so you do not need to add a separate stylesheet tag.

Existing snippets that load `https://answeringagent.com/widget.js` remain supported. New installs should use `chat.js`.

## Dashboard Setup

1. Open **Dashboard** > **Team Settings** > **Website Chat**.
2. If Website Chat is not active, choose **Activate Add-On** and complete the billing flow.
3. Review the greeting and quick replies customers will see.
4. Copy the `chat.js` snippet.
5. Paste the snippet into your website before the closing `</body>` tag, or use your site builder's custom code area.
6. Send a test message from the website and confirm the conversation appears in **Dashboard** > **Conversations** with the Website Chat filter applied.

If your team already has website chat conversations, the filtered inbox opens normally. Use **Setup & Instructions** from the inbox when you need to revisit the install snippet or widget settings.

## Features

<CardGroup cols={2}>
  <Card title="Multimodal Conversations" icon="sparkles">
    Users can type, speak, and share images - all in the same conversation
  </Card>

  <Card title="Real-Time Voice" icon="mic">
    Natural, interruption-aware voice conversations with ultra-low latency
  </Card>

  <Card title="Visual Understanding" icon="image">
    AI can see and understand images shared during the conversation
  </Card>

  <Card title="Seamless Mode Switching" icon="shuffle">
    Switch between text and voice mid-conversation without losing context
  </Card>
</CardGroup>

### Why Multimodal Matters

Traditional chatbots force users into a single mode of communication. Our multimodal AI adapts to how your users want to interact:

* **Shopping**: "Show me shoes like these" *\[uploads photo]* → AI analyzes the image and suggests similar products
* **Support**: Start typing a question, then switch to voice to explain a complex issue
* **Accessibility**: Users can choose their preferred communication method based on their needs or situation
* **Natural Flow**: Just like human conversation, users can point, show, speak, or type as needed

## Installation

### Basic Installation

Add the chat widget to your website:

```html theme={null}
<div id="answering-agent-chat" data-team-id="YOUR_TEAM_ID"></div>
<script src="https://answeringagent.com/chat.js"></script>
```

### Site Builder Installation

If your website builder only lets you add a script tag, add the team ID directly to the `chat.js` script:

```html theme={null}
<script src="https://answeringagent.com/chat.js" data-team-id="YOUR_TEAM_ID"></script>
```

This uses the same chat widget as the basic installation. The script creates the widget container automatically when one is not already present.

#### With Customization

```html theme={null}
<script
  src="https://answeringagent.com/chat.js"
  data-team-id="YOUR_TEAM_ID"
  data-avatar-orb-color-1="#1E40AF"
  data-avatar-orb-color-2="#7C3AED"
></script>
```

## Configuration

### Required Configuration

The only required configuration is your team ID:

```html theme={null}
<div id="answering-agent-chat" data-team-id="YOUR_TEAM_ID"></div>
```

### Customization Options

You can customize the widget's appearance using data attributes on the container div:

#### Widget Size

Control the widget size:

```html theme={null}
<div id="answering-agent-chat"
     data-team-id="YOUR_TEAM_ID"
     data-variant="compact">
</div>
```

* `data-variant` - Widget size (`"tiny"`, `"compact"`, `"full"`)

#### Visual Customization

Control the widget's visual appearance:

```html theme={null}
<div id="answering-agent-chat"
     data-team-id="YOUR_TEAM_ID"
     data-avatar-image-url="https://example.com/avatar.png"
     data-avatar-orb-color-1="#FF6B6B"
     data-avatar-orb-color-2="#4ECDC4">
</div>
```

* `data-avatar-image-url` - Custom avatar image URL
* `data-avatar-orb-color-1` - Primary orb gradient color (hex)
* `data-avatar-orb-color-2` - Secondary orb gradient color (hex)

### Complete Example

Here's a fully customized widget:

```html theme={null}
<div id="answering-agent-chat"
     data-team-id="YOUR_TEAM_ID"
     data-variant="compact"
     data-avatar-orb-color-1="#1E40AF"
     data-avatar-orb-color-2="#7C3AED">
</div>
<script src="https://answeringagent.com/chat.js"></script>
```

## How It Works

1. **Widget Initialization**: The widget fetches your team's AI agent configuration and prompts
2. **Conversation Start**: When a visitor starts chatting, Answering Agent creates a dashboard conversation for that website session
3. **AI Processing**: Messages are processed using your team's custom AI agent, business knowledge, and eligible integrations
4. **Data Persistence**: The conversation is saved to your dashboard and extracted after the thread goes quiet

## AI Capabilities

The chat widget uses the same AI agent as your phone system, so it can:

* **Answer business questions** using your custom knowledge base
* **Book appointments** through your integrated scheduling system
* **Access customer data** from your CRM integrations
* **Create tasks** and follow-ups in your connected systems
* **Provide quotes** and pricing information

Website chat uses the same integration framework as phone calls, but channel policy still controls which actions are safe for chat. Actions that need user approval are confirmed in the widget UI before they run.

## Conversation Extraction

Website chat conversations are extracted after **3 minutes of inactivity**. Answering Agent then creates dashboard tasks, unanswered questions, handoff details, and follow-up context from the thread.

The extraction job runs every 5 minutes, so tasks usually appear shortly after the quiet window has passed.

For a full overview of how the same AI conversation engine works across phone, website chat, SMS, and email, see [AI Conversations](/advanced/ai-conversations).

## Data & Privacy

* **Anonymous Conversations**: Chat conversations don't require visitor registration
* **Conversation History**: All conversations are saved and accessible in your dashboard
* **Secure Integration**: The widget uses secure public endpoints - no API keys are exposed
* **Team Isolation**: Each team's widget is completely isolated and secure

## Multimodal Use Cases

### Customer Support

* Users can screenshot error messages and share them directly
* Switch to voice when typing becomes cumbersome
* AI can guide users visually: "Click the button that looks like this..."

### E-commerce

* "Find me a dress like this one" with photo upload
* Voice shopping: "I need a gift for my mother's birthday"
* Visual product search and comparison

### Real Estate

* Share property photos for instant analysis
* Voice tours: "Tell me more about the kitchen"
* Mixed mode inquiries combining photos and questions

### Healthcare

* Share symptoms visually when relevant
* Voice for sensitive discussions
* Text for precise medical history

## Troubleshooting

### Which Installation Method Should I Use?

| Platform                     | Recommended Method                                          |
| ---------------------------- | ----------------------------------------------------------- |
| Custom website / Self-hosted | Basic Installation (`chat.js`)                              |
| WordPress (self-hosted)      | Basic Installation (`chat.js`)                              |
| GoDaddy Website Builder      | Site Builder Installation (`chat.js`)                       |
| Squarespace                  | Site Builder Installation (`chat.js`)                       |
| Wix                          | Site Builder Installation (`chat.js`)                       |
| Shopify                      | Basic Installation or Site Builder Installation (`chat.js`) |
| Other hosted platforms       | Basic Installation or Site Builder Installation (`chat.js`) |

### Widget Not Appearing

1. **Check team ID**: Ensure you've replaced `YOUR_TEAM_ID` with your actual team ID from the dashboard
2. **Check container**: Verify the `<div id="answering-agent-chat">` element exists in your HTML, or use the site builder installation with `data-team-id` on the script tag
3. **Check console**: Look for error messages in the browser console (press F12)
4. **Check addon status**: Ensure the chat widget addon is enabled for your account
5. **Check setup status**: Ensure Website Chat is active in Team Settings and the team has an active phone number for conversation ownership
6. **Contact support for CSP issues**: If your site blocks the script with Content Security Policy errors, contact support so we can help configure an approved installation

### Error Messages

If you see error messages in the bottom-right corner of your page:

* **"Chat widget addon is not enabled"**: Contact support to enable the chat widget addon
* **"Chat widget is not configured"**: Website Chat setup needs to be completed in Team Settings
* **"No active phone number found"**: Add an active phone number to your team

### Conversation Not Saving

1. Verify your team has an active phone number configured
2. Check that the phone number status is 'active' in your dashboard
3. Ensure the chat widget addon is enabled for your account

## Support

Contact our support team at [support@answeringagent.com](mailto:support@answeringagent.com).
